The basic idea of this blog is to document the implementation of a Map-Reduce framework on a Grid Computing architecture. The architecture will be implemented on a set of Intel Galileo Gen 2 protoyping boards. One result of this work will be a distributed system, with heterogeneous nodes geographically dispersed.

Map-Reduce Architecture on Intel Galileo

The basic idea of this blog is to document the implementation of a Map-Reduce framework on a Grid Computing architecture. The architecture will be implemented on a set of Intel Galileo Gen 2 protoyping boards. One result of this work will be a distributed system, with heterogeneous nodes geographically dispersed.

The Bachelor Thesis is co-tutored by Prof. Dr. Ralf Seepold (HTWG Konstanz - Germany, UC-Lab) and Prof. Dr. Juan Antonio Ortega (Universidad de Sevilla - Spain, Escuela Técnica Superior de Ingenería Informática). The thesis is executed during an ERASMUS+ stay at the University of Seville, Campus Reina Mercedes, Sevilla, Spain. 

Continue reading
Rate this blog entry:
4
7440 Hits 0 Comments

Hadoop cluster running on Intel Galileo Gen 2

This my first post in the UC-Lab Blog. I am studying at the University of Applied Sciences Hochschule Konstanz (HTWG) in Germany and I am writing my bachelor thesis within the Ubiquitous Computing Laboratory in cooperation with the University of Seville (ERASMUS program). My objective is to develop a Grid based system for data mining using Map-Reduce. In this blog I will docuIment my process of my bachelor thesis.

Here you can find more information about this and other projects of the UC-Lab: http://uc-lab.in.htwg-konstanz.de/ucl-projects.html


The system has to run on the Intel Galileo Gen 2 board (http://www.intel.com/content/www/us/en/do-it-yourself/galileo-maker-quark-board.html). Because of the limited resources of the boards, this is going to be one of the main aspects I have to focus on.

Figure 2 shows the setup of the four boards I develop on. 


b2ap3_thumbnail_IMG_0260.JPG

Figure 1: Setup of the Intel Galileo Gen 2 boards


The Map-Reduce (MR) programming model with the Apache Hadoop framework is one of the most well-known and usually most common models. Specifically, it supports a simple programming model so that the end-user programmer only has to write the Map-Reduce tasks. However, Hadoop itself is a name for a federation of services, like HDFS, Hive, HBase, Map-Reduce, etc. (See Figure 2: Hadoop Architecture). Apache Storm and Apache Spark are distributed realtime computation systems and can be used with some of these services.


b2ap3_thumbnail_Hadoop-Architecture.png

Figure 2: Hadoop Architecture


In a first field test, we have setup a Hadoop Cluster (v2.6) on five Intel Galileodevelopment boards. Due to the minimum resources (RAM, CPU) it was not possible to run the Hadoop system in an appropriate way. After infrastructural changes (Namenode & ResouceManager had been moved to regular workstation pc), the system provides a higher performance and usability. Simple Map-Reduce jobs (e.g. WordCount) as well as jobs with a higher complexity (Recommendation system) work, even for millions of data entries, with an acceptable performance.


Apache Storm (https://storm.apache.org) offers the opportunity to use it on Hadoop or to run it in a standalone mode. Storm is a real-time, streaming computational system. Storm is a online framework, meaning, in this sense, a service that interacts with a running application. In contrast to Map-Reduce, it receives small pieces of data as they are processed in your application. You define a DAG (Directed acyclic graph) of operations to perform on the data.

Storm doesn't have anything (necessarily) to do with persisting your data. Here, streaming is another way to say keeping the information you care about and throwing the rest away. In reality, you probably have a persistence layer in your application that has already recorded the data, and so this a good and justified separation of concerns.

At the moment I couldn't get Storm running on the Intel Galileo boards. The main problem is the operations system running on the boards. I used an existing Yocto image and found out, that there are some needed services missing. On the server, which is running with Debian OS, the setup was no problem. I think if I make my own Image with Yocto Project it should run on the boards too.


The third opportunity is Apache Spark (https://spark.apache.org). Just like Storm, Spark offers the opportunity to use it on Hadoop or to run it in a standalone mode. 

One of the most interesting features of Spark is its smart use of memory. Map-Reduce has always worked primarily with data stored on disk. Spark, by contrast, can exploit the considerable amount of RAM that is spread across all the nodes in a cluster. It is smart about use of disk for overflow data and persistence. That gives Spark huge performance advantages for many workloads.

We were able to set up Spark over the cluster, but because of the limited RAM, we weren't able to run a job on the boards successfully. Maybe with some optimization of the use of the resources we could get it running.


My next Posts will contain a detailed tutorial how I set up the different frameworks and what is important to look out for.

Continue reading
Rate this blog entry:
9
10269 Hits 0 Comments

Setup Hadoop 2.6.0 on Intel Galileo Gen 2

In this tutorial I will explain, how you can setup a Apache Hadoop Multi-Node Cluster on the Intel Galileo Gen 2 boards. The Master Node will run on a server with a Ubuntu Server OS and the four Slave Nodes will run on the Galileo boards with a Yocto OS.

The Problem are the limited resources of the Galileo boards:

Intel Galileo Gen 2 resources:

  • Intel® Quark™ SoC X1000 application processor, a 32-bit, single-core, single-thread, Intel® Pentium® processor instruction set architecture (ISA)-compatible, operating at speeds up to 400 MHz.
  • Support for a wide range of industry standard I/O interfaces, including a full-sized mini-PCI Express* slot, 100 Mb Ethernet port, microSD* slot, USB host port, and USB client port.
  • 256 MB DDR3, 512 kb embedded SRAM, 8 MB NOR Flash, and 8 kb EEPROM standard on the board, plus support for microSD card up to 32 GB.
  • Support for Yocto 1.4 Poky* Linux release.


  1. Install Hadoop
  2. Configure Master Node
  3. Configure Slave Nodes
  4. Start the Cluster 

1. Install Hadoop:

These steps you have to make on all nodes (Master Node and on all Slave Nodes) on which you want to run Hadoop.

First you have to Download Hadoop and extract the package to a location of your choice. I am using Hadoop 2.6.0.


You also need one of the latest java versions (Java 8, Java 7 or late Java 6). I am using Java 7. 


Now you set the Hadoop install directory and your Java directory to your system path. To add those permanently, you have to add the following commands to your "~/.profile"-file and reboot your system. After the reboot, check your environment variables using the "env"-command.


HADOOP_PREFIX=/path/to/Hadoop
export HADOOP_PREFIX
PATH=$PATH:$HADOOP_PREFIX/bin
export PATH
PATH=$PATH:$HADOOP_PREFIX/sbin
export PATH

JAVA_HOME=/path/to/Java
export JAVA_HOME
PATH=$PATH:$JAVA_HOME/bin
export PATH


The next step is really important! You have to setup a static IP for the Galileo boards. To do this, you have to enter the IP in your interface file and register it in runlevel five, so that it will run at the start of the system.

First, create a Backup of your interface file:

cp /etc/network/interfaces  /etc/network/interfaces.backup

vi /etc/network/interfaces


Now change "iface eth0 inet dhcd" to "iface eth0 inet static" and add the address, netmask and the gateway.

# /etc/network/interfaces -- configuration file for ifup(8), ifdown(8)

# The loopback interface
auto lo
iface lo inet loopback

# Wireless interfaces
iface wlan0 inet dhcp
        wireless_mode managed
        wireless_essid any
        wpa-driver wext
        wpa-conf /etc/wpa_supplicant.conf

iface atml0 inet dhcp

# Wired or wireless interfaces
auto eth0
iface eth0 inet static
        address x.x.x.x
        netmask 255.255.255.0
        gateway x.x.x.x

#iface eth1 inet dhcp
# Ethernet/RNDIS gadget (g_ether)
# ... or on host side, usbnet and random hwaddr
iface usb0 inet static                         
        address 192.168.7.2                    
        netmask 255.255.255.0                  
        network 192.168.7.0                    
        gateway 192.168.7.1                    
                                               
# Bluetooth networking                         
iface bnep0 inet dhcp              

The last step is to remove the startup script "S05connman" and add the networking script to "S05networking" in runlevel five. 

rm /etc/rc5.d/S05connman

ln -s ../init.d/networking /etc/rc5.d/S05networking

 Be sure that your system is in runlevel five by using the runlevel-command:

uc-lab-node-3:~# runlevel
N 5

Now, that you have everything to run Hadoop, we will modify the Hadoop configuration to run the Server as our Master Node and the Galileo boards as our Slave Nodes. 


2. Configuration Master Node:

We have to modify five hadoop configuration files to run the cluster (here you can find a detailed description of all configuration parameters). I recommend, to map the IPs of all Nodes (Master and Slaves) with concise names, so you don´t have to enter the IPs every time. Therefor, add the IPs and the names you have chosen to your host-file on your Master Node.

b2ap3_thumbnail_Bildschirmfoto-2015-04-05-um-13.48.08.png

Here is an example of the hosts file:


127.0.0.1        localhost
x.x.x.x          uc-lab-master-node
x.x.x.x          uc-lab-node-1
x.x.x.x          uc-lab-node-2
x.x.x.x          uc-lab-node-3
x.x.x.x          uc-lab-node-4


Now we navigate to the etc/hadoop folder in our Hadoop install directory and open the core-site.xml file.

b2ap3_thumbnail_Bildschirmfoto-2015-04-05-um-13.57.26.png 


First, we have to change the fs.default.name parameter, which specifies the NameNode host and port.

<?xml version="1.0" encoding="UTF-8"?>
<?xml-stylesheet type="text/xsl" href="/configuration.xsl"?>
<!--
  Licensed under the Apache License, Version 2.0 (the "License");
  you may not use this file except in compliance with the License.
  You may obtain a copy of the License at

    http://www.apache.org/licenses/LICENSE-2.0

  Unless required by applicable law or agreed to in writing, software
  distributed under the License is distributed on an "AS IS" BASIS,
  WITHOUT WARRANTIES OR CONDITIONS OF ANY KIND, either express or implied.
  See the License for the specific language governing permissions and
  limitations under the License. See accompanying LICENSE file.
-->

<!-- Put site-specific property overrides in this file. -->

<configuration>

<property>
    <name>fs.defaultFS</name>
    <value>hdfs://uc-lab-master-node:9000</value>
</property>

</configuration>


Second, we have to modify the hdf-site.xml file. Here we change the dfs.permissions which specifies the permisson checking, the dfs.replication parameter specifies the default block replication, the dfs.namenode.name.dir specifies the path on the local filesystem where the NameNode (Master Node) stores the namespace and transactions logs and the dfs.datanode.data.dir parameter specifies the path where the blocks on the datanodes (Slave Nodes) are stored. The data on the Slave Nodes are stored on 32GB microSD cards.

<?xml version="1.0" encoding="UTF-8"?>
<?xml-stylesheet type="text/xsl" href="/configuration.xsl"?>
<!--
  Licensed under the Apache License, Version 2.0 (the "License");
  you may not use this file except in compliance with the License.
  You may obtain a copy of the License at

    http://www.apache.org/licenses/LICENSE-2.0

  Unless required by applicable law or agreed to in writing, software
  distributed under the License is distributed on an "AS IS" BASIS,
  WITHOUT WARRANTIES OR CONDITIONS OF ANY KIND, either express or implied.
  See the License for the specific language governing permissions and
  limitations under the License. See accompanying LICENSE file.
-->

<!-- Put site-specific property overrides in this file. -->

<configuration>

<property>
   <name>dfs.permissions</name>
   <value>false</value>
</property>

<property>
    <name>dfs.replication</name>
    <value>3</value>
</property>

<property>
    <name>dfs.namenode.name.dir</name>
    <value>file:/usr/local/hadoop/hdfs/namenode</value>
</property>

<property>
    <name>dfs.datanode.data.dir</name>
    <value>file:/media/mmcblk0p1/hadoop_data/hdfs/datanode</value>
</property>

</configuration>


Third, we have to modify the yarn-site.xml. Here we specify the properties for the NodeManager and the ResourceManager. The first two properties (yarn.nodemanager.aux-services and yarn.nodemanager.aux-services.mapreduce.shuffle.class) are set by default. Those are to set the shuffle service that needs to be set for Map Reduce applications. The yarn.resourcemanager.resource-tracker.address parameter specifies the host and port for the NodeManagers running on the Slave Nodes, the yarn.resourcemanager.scheduler.address parameter specifies the host and port for the ApplicationMasters to talk to scheduler to obtain resources and the yarn.resourcemanager.address parameter specifies the host and port for clients to submit jobs.

<?xml version="1.0"?>
<!--
  Licensed under the Apache License, Version 2.0 (the "License");
  you may not use this file except in compliance with the License.
  You may obtain a copy of the License at

    http://www.apache.org/licenses/LICENSE-2.0

  Unless required by applicable law or agreed to in writing, software
  distributed under the License is distributed on an "AS IS" BASIS,
  WITHOUT WARRANTIES OR CONDITIONS OF ANY KIND, either express or implied.
  See the License for the specific language governing permissions and
  limitations under the License. See accompanying LICENSE file.
-->
<configuration>

<!-- Site specific YARN configuration properties -->

<property>
   <name>yarn.nodemanager.aux-services</name>
   <value>mapreduce_shuffle</value>
</property>

<property>
   <name>yarn.nodemanager.aux-services.mapreduce.shuffle.class</name>
   <value>org.apache.hadoop.mapred.ShuffleHandler</value>
</property>

<property>
   <name>yarn.resourcemanager.resource-tracker.address</name>
   <value>uc-lab-master-node:8025</value>
</property>

<property>
   <name>yarn.resourcemanager.scheduler.address</name>
   <value>uc-lab-master-node:8030</value>
</property>

<property>
   <name>yarn.resourcemanager.address</name>
   <value>uc-lab-master-node:8050</value>
</property>

</configuration>


Fourth, we have to modify the mapred-site.xml. Here we change the mapred.job.tracker parameter which specifies JobTracker host and port. The mapreduce.jobhistory.address and mapreduce.jobhistory.webapp.address specify the host and port of the JobHistory Server and the corresponding Web UI.

<?xml version="1.0"?>
<?xml-stylesheet type="text/xsl" href="/configuration.xsl"?>
<!--
  Licensed under the Apache License, Version 2.0 (the "License");
  you may not use this file except in compliance with the License.
  You may obtain a copy of the License at

    http://www.apache.org/licenses/LICENSE-2.0

  Unless required by applicable law or agreed to in writing, software
  distributed under the License is distributed on an "AS IS" BASIS,
  WITHOUT WARRANTIES OR CONDITIONS OF ANY KIND, either express or implied.
  See the License for the specific language governing permissions and
  limitations under the License. See accompanying LICENSE file.
-->

<!-- Put site-specific property overrides in this file. -->

<configuration>

<property>
   <name>mapred.job.tracker</name>
   <value>uc-lab-master-node:54311</value>
</property>

<property>
   <name>mapreduce.jobhistory.address</name>
   <value>uc-lab-master-node:10020</value>
</property>

<property>
   <name>mapreduce.jobhistory.webapp.address</name>
   <value>uc-lab-master-node:19888</value>
</property>


</configuration>


The last file we have to modify is the slaves file. Here we have to register all slave nodes of the cluster. Thats what my slaves file looks like:

uc-lab-node-1
uc-lab-node-2
uc-lab-node-3
uc-lab-node-4

You can also enter the ip´s of the slaves if you did not registerd them in the hosts file.

Now the Master Node is ready and we can configure our Slave Nodes. 


 3. Configuration Slave Nodes:

The core-site.xml and the yarn-site.xml are the same as on the Master Node and the slaves file has not to be modified. 

First, we modify the mapred-site.xml.template. Copy or rename the file to mapred-site.xml and add the following properties. The mapred.job.tracker parameter specifies the host and port that the MapReduce job tracker runs at.

<?xml version="1.0"?>
<?xml-stylesheet type="text/xsl" href="/configuration.xsl"?>
<!--
  Licensed under the Apache License, Version 2.0 (the "License");
  you may not use this file except in compliance with the License.
  You may obtain a copy of the License at

    http://www.apache.org/licenses/LICENSE-2.0

  Unless required by applicable law or agreed to in writing, software
  distributed under the License is distributed on an "AS IS" BASIS,
  WITHOUT WARRANTIES OR CONDITIONS OF ANY KIND, either express or implied.
  See the License for the specific language governing permissions and
  limitations under the License. See accompanying LICENSE file.
-->

<!-- Put site-specific property overrides in this file. -->

<configuration>
<property>
   <name>mapred.job.tracker</name>
   <value>uc-lab-master-node:54311</value>
</property>

</configuration>


Second, we modify the hdfs-site.xml. This file almost looks like the one on the Master Node. We just have to remove the dfs.namenode.name.dir property.

<?xml version="1.0" encoding="UTF-8"?>
<?xml-stylesheet type="text/xsl" href="/configuration.xsl"?>
<!--
  Licensed under the Apache License, Version 2.0 (the "License");
  you may not use this file except in compliance with the License.
  You may obtain a copy of the License at

    http://www.apache.org/licenses/LICENSE-2.0

  Unless required by applicable law or agreed to in writing, software
  distributed under the License is distributed on an "AS IS" BASIS,
  WITHOUT WARRANTIES OR CONDITIONS OF ANY KIND, either express or implied.
  See the License for the specific language governing permissions and
  limitations under the License. See accompanying LICENSE file.
-->

<!-- Put site-specific property overrides in this file. -->

<configuration>

<property>
   <name>dfs.replication</name>
   <value>3</value>
</property>

<property>
   <name>dfs.datanode.data.dir</name>
   <value>file:/media/mmcblk0p1/hadoop_data/hdfs/datanode</value>
</property>

</configuration>


Now we can start the cluster. 


 4. Start the Cluster:

First you go to you Hadoop install directory on Your Master Node. Now you have to format the NameNode by executing the following command:

galileo@uc-lab-master-node:/usr/local/hadoop-2.6.0$ ./bin/hadoop namenode -format


This creates the in the hdfs-site.xml defined location for the Namenode.

To start the cluster I wrote a script to make it easier and to be sure that everything starts in the write order:

#!/bin/bash

slaveList=$1
dataNodes=`cat $slaveList`

hadoop-daemon.sh start namenode

hadoop-daemon.sh start secondarynamenode

for node in $dataNodes ; do
    ssh root@$node $HADOOP_PREFIX/sbin/hadoop-daemon.sh start datanode
done

yarn-daemon.sh start resourcemanager

for node in $dataNodes ; do
    ssh root@$node $HADOOP_PREFIX/sbin/yarn-daemon.sh start nodemanager
done

mr-jobhistory-daemon.sh start historyserver


This script needs the slaves file located in the etc/hadoop/ folder.

sh start-cluster.sh etc/hadoop/slaves


This starts the NameNode, SecondaryNameNode, ResourceManager and the JobHistoryServer on the Master Node and the DataNode and NodeManager on all saves registered in the slaves file.

If you now execute the jps command, it should look like this:

Master:

galileo@uc-lab-master-node:/usr/local/hadoop-2.6.0$ jps

29406 SecondaryNameNode

29736 JobHistoryServer

29478 ResourceManager

29778 Jps

29313 NameNode


Slaves:

root@uc-lab-node-1:/usr/local/hadoop-2.6.0# jps

2912 Jps

2704 NodeManager

2644 DataNode


If you get an output like this, the cluster is working and you can enter the Web UI.

To enter the Web UI you enter the IP of the Master Node and the default Port 50070 (you can change this port by adding the dfs.namenode.http-address parameter to the hdfs-site.xml file).

http://<IP>:50070/

  • Table_1

(click to enlarge)


Continue reading
Rate this blog entry:
13
9050 Hits 0 Comments

Hadoop Benchmark Test

In this blog post I am going to show you the results of testing my Hadoop cluster (running on four Intel Galileo Gen 2 boards with 256MB RAM and a singel-core processor) and compare them to a Hadoop cluster running on four servers with 16GB RAM and a dual-core processor. I will run two different kinds of Tests. The first test is a simple word count. This is part of the Apache Hadoop distribution, so it should already be available in your cluster. For the second test I´m running the Mahout recommendation engine on different sets of movie ratings. The result is a movie recommendation for each User.


  1. Prerequisites
  2. WordCount
  3. Mahout recommendation engine


1. Prerequisites

First of all you need access to a running hadoop cluster. If you want to set up your own cluster, my earlier post might help you:

https://uc-lab.in.htwg-konstanz.de/blogging/blogger/listings/mario-miosga.html

For the first test, that´s everything you need till this moment.

For my second test you need to download Mahout and extract it on your Master Node:

http://www.apache.org/dyn/closer.cgi/mahout/

My cluster is running with Hadoop 2.6.0 and I installed Mahout 0.10.0.


2. WordCount

As I said, with a working hadoop cluster we have almost everything we need to run the test. I say almost, because of course we need some text files to run a word count. I recommend downloading a Wikipedia database dump. Of course you can use any other text file as well.

To run the test the first thing you have to do is to create a directory on HSDF (Hadoop Distributed File System), in which you want to store your files on the cluster. To do that, you execute this command on your Master Node:

hdfs dfs -mkdir /Dir/On/Hdfs/

Now, that we have an empty directory on our cluster, we copy our files on it. The "-copyFromLocal" command is executed recursiv, so that you can enter a hole folder with several text files.

hdfs dfs -copyFromLocal /Local/Path/To/Your/Text/Files /Dir/On/Hdfs

Finally, we can run our test! As I said before, Hadoop itself as some tool you can use to test your cluster. These Tools are Part of the Apache Hadoop distribution, so they are located in your Hadoop install directory.

To run the test, execute the following command:

hadoop jar /HadoopDir/share/hadoop/mapreduce/hadoop-mapreduce-examples-2.6.0.jar wordcount /Dir/On/Hdfs /Output/Dir/On/Hdfs


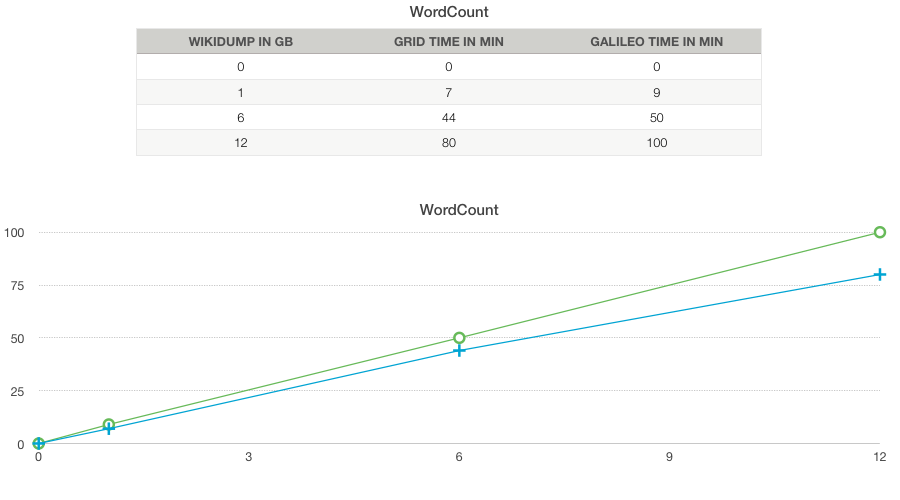
I run this Test with three different sizes (1GB, 6GB, 12GB).


(click to enlarge)


3. Mahout recommendation engine

Of course, for this test we need different files as for the word count. It is necessary, that the files contain a user-ID, item-ID and a rating. The user-ID and item-ID have to be integer values, the rating should be also an interger or a double value. The three values are seperated with a tab and each rating has to be in a new line.

So that is the Format that we need:

[user id]    [item id]    [rating]

[user id]    [item id]    [rating]

                   .

                   .

                   .

The GroupLens Movie DataSet provides the rating of movies in this format. As you can see, the largest data set contains 20 million ratings an has a size of 132MB. I wanted to test my cluster with larger files. That´s why I wrote a small java application to generate my own data sets.


import java.io.BufferedWriter;
import java.io.File;
import java.io.FileOutputStream;
import java.io.IOException;
import java.io.OutputStreamWriter;
import java.util.Random;


public class Main {

	public static void main(String[] args) throws IOException {
		try {
			writeFile1();
			writeFile2();
			writeFile3();
		} catch (IOException e) {
			// TODO Auto-generated catch block
			e.printStackTrace();
		}
	}
	public static void writeFile1() throws IOException {
		File fout = new File("200MB.data");
		FileOutputStream fos = new FileOutputStream(fout);

		BufferedWriter bw = new BufferedWriter(new OutputStreamWriter(fos));

		for (int userID = 0; userID  300000; userID++) {
			
			for (int y = 0; y  50; y++) {
				int rMovieID = new Random().nxtInt(20000);
				int rUserRating = new Random().nextInt(5);
				bw.write(userID + "t" + rMovieID + "t" + rUserRating);
				bw.newLine();
			}
			
		}

		bw.close();
	}

	public static void writeFile2() throws IOException {
		File fout = new File("600MB.data");
		FileOutputStream fos = new FileOutputStream(fout);

		BufferedWriter bw = new BufferedWriter(new OutputStreamWriter(fos));

		for (int userID = 0; userID  900000; userID++) {
			
			for (int y = 0; y  50; y++) {
				int rMovieID = new Random().nxtInt(20000);
				int rUserRating = new Random().nextnt(5);
				bw.write(userID + "t" + rMovieID + "t" + rUserRating);
				bw.newLine();
			}
			
		}

		bw.close();
	}

	public static void writeFile3() throws IOException {
		File fout = new File("1GB.data");
		FileOutputStream fos = new FileOutputStream(fout);

		BufferedWriter bw = new BufferedWriter(new OutputStreaWriter(fos));

		for (int userID = 0; userID < 1500000; userID++) {
			
			for (int y = 0; y  50; y++) {
				int rMovieID = new Random().nextInt(20000);
				int rUserRating = new Random().nextInt(5);
				bw.write(userID + "t" + rMovieID + "t" + rUserRating);
				bw.newLine();
			}
			
		}

		bw.close();
	}
}


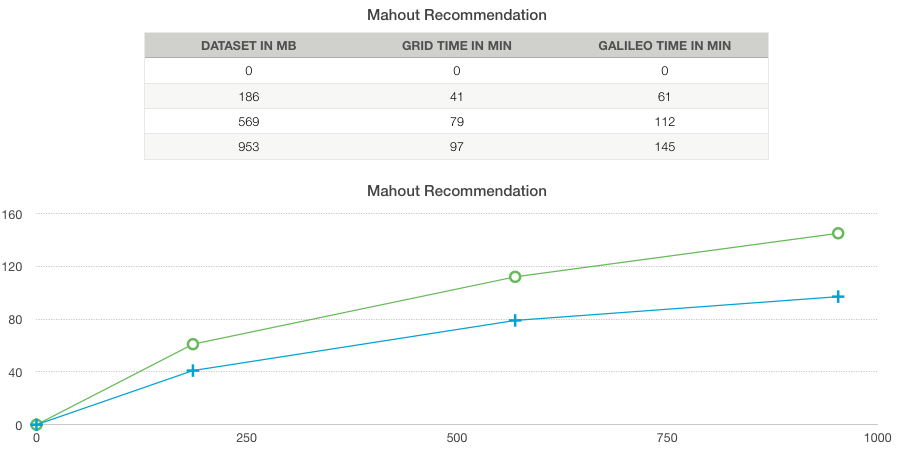
This program generates three files (~200MB, ~600MB and ~1GB) where each user gives 50 movie ratings within a list of 20.000 movies. The number of users depends on the file size.


Mahout will execute several Hadoop Map-Reduce jobs. The result of this test is a recommendation of 10 movies for each user based on their own ratings.

If you have your files, you have to put those files on the hdfs the same way, as in the word count example:

Make the directory on the hdfs:

hdfs dfs -mkdir /Dir/On/Hdfs/

And copy the files from your local directory to the hdfs directory:

hdfs dfs -copyFromLocal /Local/Path/To/Your/Text/Files /Dir/On/Hdfs

Now lets run the mahout job:

hadoop jar /MahoutDir/mahout-examples-0.10.0-job.jar org.apache.mahout.cf.taste.hadoop.item.RecommenderJob -s SIMILARITY_COOCCURRENCE --input /Dir/On/Hdfs --output /Output/Dir/On/Hdfs


With the argument "-s SIMILARITY_COOCURRENCE", we tell the recommender which item similary formula to use. With SIMILARITY COOCURRENCE, two items(movies) are very similar if they often appear together in users' rating. So to find the movies to recommend to a user, we need to find the 10 movies most similar to the movies the user has rated. 

The output of the Test looks like this:

0       [18129:5.0,13737:5.0,8951:5.0,7213:5.0,16772:5.0,7642:5.0,4069:5.0,411:5.0,2791:5.0,16759:5.0]
1       [2059:5.0,10184:5.0,17590:5.0,2871:5.0,870:5.0,19185:5.0,1281:5.0,6392:5.0,1117:5.0,7139:5.0]
2       [11044:5.0,18414:5.0,14435:5.0,3349:5.0,17946:5.0,16225:5.0,14865:5.0,15280:5.0,10023:5.0,6906:5.0]
3       [14065:5.0,5897:5.0,4739:5.0,5667:5.0,3598:5.0,6008:5.0,4054:5.0,9527:5.0,2844:5.0,19040:5.0]
4       [623:5.0,381:5.0,12273:5.0,14361:5.0,13688:5.0,2695:5.0,16203:5.0,6254:5.0,18800:5.0,11605:4.6666665]
5       [5942:5.0,17290:5.0,2350:5.0,14588:5.0,12910:5.0,15978:5.0,5824:5.0,15934:5.0,9882:5.0,2154:5.0]
6       [19701:5.0,14598:5.0,11787:5.0,12366:5.0,16515:5.0,4657:5.0,1440:5.0,15894:5.0,7540:5.0,10954:5.0]
7       [2299:5.0,9519:5.0,989:5.0,16658:5.0,3011:5.0,13744:5.0,6464:5.0,750:5.0,1356:5.0,14518:5.0]
8       [2965:5.0,360:5.0,1719:5.0,18470:5.0,1475:5.0,6528:5.0,516:5.0,8982:5.0,10998:5.0,2161:5.0]
9       [10924:5.0,4717:5.0,6913:5.0,5931:5.0,18297:5.0,1574:5.0,6579:5.0,13359:5.0,4983:5.0,5285:5.0]
10      [3263:5.0,2423:5.0,17065:5.0,4752:5.0,8871:5.0,12535:5.0,17389:5.0,3579:5.0,19333:5.0,6204:5.0]
11      [19639:5.0,14863:5.0,18538:5.0,11561:5.0,11348:5.0,15314:5.0,1293:5.0,5260:5.0,7448:5.0,15790:5.0]
12      [412:5.0,12430:5.0,7073:5.0,19512:5.0,1864:5.0,19451:5.0,4155:5.0,2562:5.0,10372:5.0,11274:5.0]
13      [5741:5.0,4280:5.0,16453:5.0,14721:5.0,7230:5.0,360:5.0,1183:5.0,11208:5.0,4705:5.0,1845:5.0]
14      [6457:5.0,16468:5.0,6075:5.0,3295:5.0,4177:5.0,6267:5.0,3637:5.0,4620:5.0,4344:5.0,1189:5.0]
15      [10199:5.0,180:5.0,7722:5.0,7684:5.0,3281:5.0,18349:5.0,19715:5.0,10212:5.0,13544:5.0,13517:5.0]
16      [9406:5.0,19185:5.0,15019:5.0,4708:5.0,14244:5.0,9778:5.0,5444:5.0,1925:5.0,5568:5.0,15664:5.0]
17      [17349:5.0,2665:5.0,2565:5.0,18053:5.0,2489:5.0,6308:5.0,2470:5.0,8941:5.0,2959:5.0,2457:5.0]
18      [14841:5.0,7721:5.0,1969:5.0,11501:5.0,10028:5.0,6653:5.0,504:5.0,4873:5.0,12254:5.0,1000:5.0]
19      [8657:5.0,3315:5.0,18896:5.0,10786:5.0,10334:5.0,5670:5.0,4591:5.0,2946:5.0,2049:5.0,4016:5.0]
20      [10390:5.0,13986:5.0,16931:5.0,8973:5.0,3959:5.0,4917:5.0,8398:5.0,5220:5.0,13010:5.0,5929:5.0]


Here you can see the 10 recommended movies for each user.


 (click to enlarge) 


A big issue that I was facing during the tests is the small amount of RAM on the Galileo boards.

As a result, this error occurred very often during the tests:

java.lang.Exception: java.lang.OutOfMemoryError: Java heap space

at org.apache.hadoop.mapred.LocalJobRunner$Job.runTasks(LocalJobRunner.java:462)

at org.apache.hadoop.mapred.LocalJobRunner$Job.run(LocalJobRunner.java:522)

Caused by: java.lang.OutOfMemoryError: Java heap space


In a Hadoop cluster, it is important to balance the usage of memory (RAM), processors (CPU cores) and disks so that processing is not constrained by any one of these resources. As a general recommendation, allowing for two Containers per disk and per core gives the best balance for cluster utilization.

When determining the appropriate MapReduce memory configurations for a cluster node, start with the available hardware resources. Specifically, note the following values on each node:

RAM (Amount of memory)

CORES (Number of CPU cores)

DISKS (Number of disks)


A detailed tutorial on how to configure the resource usage can be found at this article:

Determine HDP Memory Configuration Settings


Continue reading
Rate this blog entry:
5
5424 Hits 2 Comments